Introduction & General Remarks
Although you will implement a fully functional operating system over the course of this semester, you won't have to start completely from scratch – you are provided a very basic skeleton including the boot up code required for the x64 architecture and some helper classes (e.g. for the Advanced Configuration and Power Interface).
There are basically two different variants of StuBS (Studentenbetriebssystem):
- OOStuBS (Objektorientiertes Studentenbetriebssystem) as single-core variant)
- MPStuBS (Mehrprozessor Studentenbetriebssystem) as multi-core variant
Each version has separate handouts, however, they only differ in a few places. If you are still unsure which variant you want to implement, we recommend starting with MPStuBS as it is relatively easy to downgrade from MPStuBS to OOStuBS at a later point in time.
You can find the description of the development environment here.
This website houses both assignments and documentation, in fact, they are quite closely linked: In the class documentation, methods to be implemented or extended are visually marked with a red border and contain further details in their descriptions. Since OOStuBS and MPStuBS are very similar, the documentation on the website is valid for both variants (if a variant requires special handling, it is explicitly mentioned).
The described class interfaces (and the file structures) are usually required for subsequent assignments, so please try to stick to the specification. However, it is totally fine to add helper attributes/methods/functions (or even classes).
Coding Style
Similar to Google C++ Style Guide but with following exceptions:
- No license boilerplate
- Tabs instead of Spaces
Use the lint target (employing cpplint) to check the compliance of your code:
make lint
Naming Convention
- Variables: lowercase with underscore char* variable_name;
- Constants (and enum values): uppercase with underscore const int CONST_VALUE = 42;
- Type Names (class/struct/namespace/enum): Capital letter, camel case class SomeClassName;
- Methods/Functions (C++): start with lowercase letter, then camel case void someFunctionName();
- extern "C" Functions: lowercase with underscore (like variables). void interrupt_handler(Core::Interrupt::Vector vector, InterruptContext *context)High-Level Interrupt Handling.Definition: handler.cc:9
- File Names: lowercase, main type name, underscores only if is a sub type
folder/classname.cc
I/O Support for StuBS
Implement output (on the CGA Text Mode and the Serial Console) and input (via Keyboard).
Learning Objectives
- Getting to know the development environment
- Refreshing the knowledge of the programming language C++
- Hardware programming (CGA text mode and keyboard)
Output on CGA Text Mode
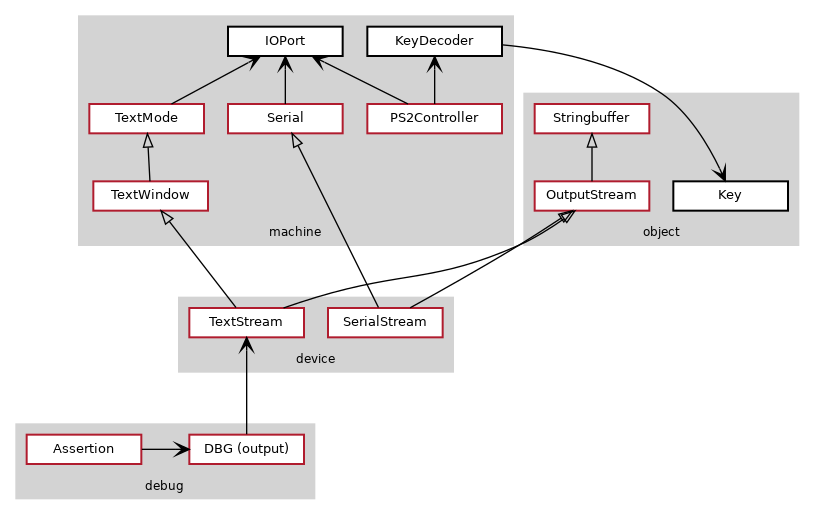
When it comes to basic debugging in StuBS, output functions are quite essential. For simplicity, TextStream provides the same basic interface as the C++ I/O streams library. It is implemented with the help of the classes OutputStream (which itself is based on Stringbuffer) and TextWindow (based on TextMode, which makes use of the already implemented IOPort).
In case you have successfully solved the (voluntary) assignment 0, you should be able to use your solution of the OutputStream without any modifications.
TextMode is the central abstraction for the text mode, managing the output of characters on the screen and controlling the text cursor position. The derived class TextWindow can be configured via the constructor in such a way that it displays the output on an adjustable rectangular section of the screen. This allows you to divide the screen and have separate TextWindow instances responsible for the output in those individual subareas (so called windows). Furthermore, you can configure whether each corresponding window should use the hardware cursor or not.
To make sure that the output functions can be used everywhere in the operating system, several global TextStream objects should be created:
- The main window
koutfor application output using the hardware cursor. - For debugging output, OOStuBS has a single debug window object called
dout, whereas MPStuBS uses an array of objects for each CPU core (also calleddoutwith Core::MAX elements), providing a separate debug window for each core.
The file debug/output.h defines the macro DBG, which employs dout and should be used for debug output: In MPStuBS this macro will select the dout object for the corresponding core it is executed on (using Core::getID()). Furthermore, DBG outputs its messages additionally to the serial console to allow easy capturing and scrolling (see the next section).
All instances of the class TextStream should output their output in disjunctive areas of the screen to avoid overlapping output.
Demonstrate the functionality of the output with the following code:
Implementation Notes
You can divide this task into three independent parts that can be solved and tested very well individually. We therefore recommend to implement the necessary classes in the following order:
- Stringbuffer and OutputStream (and a small test application)
- TextMode and TextWindow (and a small test application)
- TextStream, the debug macros and the test program
- Note
- In later tasks, application and test code will be implemented in the Application class instead of main(). It is up to you to already handle it that way in this assignment.
Further Reading
Input using Keyboard
In addition to text output, input via keyboard should also be supported (whereby the test of input is not possible without output). For this purpose you should complete the PS2Controller by using the KeyDecoder (which evaluates Make & Break codes in order to decode pressed keys).
Your test application should repeatedly query pressed keys from the keyboard and print their ASCII values using kout.
For MPStuBS, the test program should look quite similar to OOStuBS: It is sufficient to run the test application on the first core (aka BSP, boot processor) – the other cores (aka APs, application processors) should only do output using the debug macro to verify their functionality.
- Note
- If multiple cores perform concurrent output via
kout, you will end up in an alphabetical jumble. Try to locate the root cause of this issue (you will be able to fix it in subsequent assignments).
Further Reading
Using the Serial Console
In this sub-exercise, you should extend your StuBS with a serial interface. A SerialStream further enables output in a VT100-compatible terminal. This is especially useful when debugging your code on real hardware.
- Note
- We configured Qemu to redirect the
COM1port per default to another Qemu subwindow. If you use Qemu's curses interface (e.g.,make qemu-curses), you can display that subwindow withAlt-3. With the graphical variant it isCtrl-Alt-3.